Earlier in the semester, the class had created maps to be used later for a traditional navigation exercise. This week we completed that exercise. We were given printed versions of the maps we made, coordinates to travel to, and a compass to give bearing from point to point. This is a skill that is most defiantly needed since GPS technology is not always available depending on the area you are in and studying.
Study Area
The study area for this exercise was the University of Wisconsin- Eau Claire (UWEC) Priory (Fig 1). This is a very secluded area that is heavily wooded with trees and small brush. The weather included Sunny skies and mid 60 degree temperatures.
Figure 1. Aerial image of the UWEC Priory. This was the site for the traditional navigation.
Methods
The purpose of this exercise was to take a traditional map (Fig 2) and try to accurately plot given points and navigate from point to point and end back where we started. To do so, we first had to plot the points. The points were given to us in UTM coordinates. How accurate we were definitely depended on the scaling of our maps and grid scale.
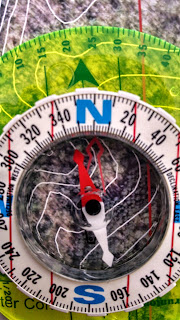
Next, we were given our compasses and needed to calculate the azimuths from point to point. The first step is to set the compass on the map (not on or near any metal surfaces) and line it up with the first point and the point of interest (Fig 3). It is important to make sure the arrow of travel is going in the correct direction (pointed towards point of interest). Next, turn the bearing on the compass so that North is accurately pointing North (Fig 4). Reading the degrees at the arrow of travel and this is the azimuth to use while traveling to that point (Fig 5).
Do this for all point to point travels and record since it is much easier to do on a flat surface compared to out in the woods. You can calculate the distances by using the scale bar so that you an rough estimate of how far is needed to travel.
When traveling, keep the red arrow (north arrow) lined up with the red outline and keep traveling towards the arrow.
Figure 2. Map created in previous exercise of the Priory. The map with the UTM grid was used to complete the exercise.
Figure 3. First step in calculating the azimuth. Line the compass up with the start point and point of interest. It is import to make sure the arrow of travel is in the correct direction.
Figure 4. Second step in calculating azimuth. Turn the compass bearing so that North is accurately pointing North.
Figure 5. Step three of calculating the azimuth. Read the degrees at the arrow of travel.
Figure 6. Set the azimuth and keep "Red in the Shed" (line red arrow up with red outline) and travel to desired point.
Discussion
This is a very vital skill to know and use. GPS is not always available and your life could depend on knowing these skills. Our Azimuths were mostly accurate, but could have been more precise if our map had better scaling on the grid. Some points were generalized since the grill scale did not have enough smaller intervals.
Although calculating the distances from the map can be useful, they are not nearly accurate. Depending on the terrain, the distances were longer then planned as we counted our paces. The terrain in the Priory can be very steep in places and includes several valleys. Depending on the objects on the ground, you can not always walk in a straight line and can set you off pace.


No comments:
Post a Comment